- AI upscalers use neural networks trained on millions of images to reconstruct detail, not just stretch pixels
- 2x is safe for web, 3x for small prints, 4x for print at 300 DPI — beyond 4x results degrade rapidly
- Always start with the highest-quality source — upscaling cannot create detail that was never captured
- Choose content-specific models: photos, anime/illustrations, faces, and text each need different algorithms
- Real-ESRGAN and Upscayl are free and run locally for full privacy; Topaz Gigapixel is the paid benchmark
- Clean JPEG artifacts before upscaling — compression blocks get amplified at higher resolutions
- Check at 100% zoom before delivering — plastic skin and hallucinated details hide at thumbnail size
- E-commerce platforms like Amazon require 1000px minimum; upscale supplier images to meet compliance
What Is Image Upscaling
Image upscaling increases the pixel dimensions of a photo while attempting to preserve or reconstruct detail — the opposite of downsizing.
Resizing changes pixel dimensions using mathematical formulas that blend existing pixels. Upscaling uses AI neural networks to generate new pixels that reconstruct textures, edges, and fine detail. The difference matters: resizing produces soft, blurry results at 2x and above. AI upscaling produces sharp, natural-looking images that appear to have been captured at the higher resolution.
A 500×500 pixel thumbnail resized to 2000×2000 looks blurry and blocky. The same thumbnail upscaled with AI looks like a genuine 2000×2000 photo with smooth edges, clear textures, and natural detail. This is possible because the AI model has learned what real-world images look like at high resolution and can predict what detail should exist.
Resizing stretches pixels to fit new dimensions. Upscaling generates new pixels to fill larger dimensions. Enhancing improves quality at the current resolution (sharpen, denoise, color correct). Most modern tools combine all three in one pass.
How AI Upscaling Works
Diffusion models invent, GANs reconstruct — know which engine you are running so 4x never surprises you.
AI upscaling is based on super-resolution — a technique where neural networks learn to reconstruct high-resolution images from low-resolution input. The most common architecture is the GAN (Generative Adversarial Network), where two neural networks compete: one generates upscaled images, the other judges whether they look real. Through millions of training iterations, the generator learns to produce results that fool the judge.
Training on image pairs
The model trains on millions of low-resolution and high-resolution image pairs. It learns the relationship between blurry input and sharp output — how edges should look, how textures should appear, how gradients should smooth.
Feature extraction
When you upload an image, the AI first identifies features: edges, textures, flat areas, faces, text, and gradients. Each feature type gets processed differently — skin gets smoothed differently than fabric, text gets sharpened differently than sky.
Pixel prediction
For each new pixel in the upscaled image, the model predicts its value based on surrounding pixels and learned patterns. At 2x, each pixel becomes 4 pixels. At 4x, each pixel becomes 16 pixels. The AI fills in all of them with plausible detail.
Adversarial refinement
The discriminator network checks whether the output looks like a real photo. If it detects artificial-looking patterns, the generator adjusts. This competitive process produces increasingly realistic results through training.
Upscaling vs Downscaling
One direction preserves quality perfectly. The other generates data that may not match reality.
Downscaling (Reducing Size)
Going from 4000×4000 to 1000×1000 discards pixel data but keeps the image looking sharp and natural. The algorithm averages or samples pixels, producing clean results. Quality is always preserved or improved for web display.
Upscaling (Increasing Size)
Going from 500×500 to 2000×2000 generates new pixel data. AI reconstructs detail, but the result depends on the source quality and model accuracy. Artifacts, hallucination, and over-smoothing are possible at higher scale factors.
Always downscale from a larger source when possible. A 4000×4000 image downscaled to 1000×1000 looks better than a 500×500 image upscaled to 1000×1000. If you must upscale, start from the highest quality original available.
AI vs Traditional Upscaling
Mathematical interpolation versus neural network reconstruction — the results are dramatically different at 2x and beyond.
| Method | How It Works | Max Usable Scale | Best For |
|---|---|---|---|
| Nearest Neighbor | Copies pixels exactly, no blending | 1x only | Pixel art, technical images |
| Bilinear | Averages 2 neighboring pixels | Up to 1.5x | Quick previews |
| Bicubic | Averages 16 neighboring pixels | Up to 2x | Mild enlargement |
| Lanczos | Uses sinc function for sharper results | Up to 2x | High-quality traditional resize |
| AI Super Resolution | Neural network reconstructs detail | 2x – 4x | Photos, illustrations, print |
For enlargements beyond 2x, traditional interpolation cannot compete with AI. Bicubic at 4x produces a blurry mess. Real-ESRGAN at 4x produces a sharp, detailed image. The gap widens as scale increases.
What Upscaling Can and Cannot Do
Honest expectations prevent disappointment. Here is what AI can realistically recover and what it cannot.
Can Do
Smooth pixelated edges. Reconstruct recognizable textures. Reduce JPEG blockiness. Produce larger images that look natural at normal viewing distance. Restore detail in slightly soft photos. Make images print-ready from web-sized originals.
Cannot Do
Invent true detail that was never captured. Fix bad lighting or exposure. Create sharp images from completely out-of-focus originals. Recover text that was illegible in the source. Guarantee pixel-perfect accuracy of generated details. Replace a high-resolution original.
AI upscalers generate plausible detail, not guaranteed truth. They may create realistic-looking textures that differ from reality. For images where accuracy is critical (medical, forensic, scientific), use non-generative upscaling methods instead.
Scale Factor Guidelines
Choosing the right scale factor balances quality, file size, and intended use.
| Scale Factor | Result | Use Case | Quality |
|---|---|---|---|
| 2x | 500px → 1000px | Social media, web display, thumbnails | Excellent — nearly always looks natural |
| 3x | 500px → 1500px | Small prints, high-DPI web, detail-heavy images | Very good — slight over-smoothing possible |
| 4x | 500px → 2000px | Print at 300 DPI, e-commerce product images | Good — inspect at 100% before delivery |
| 6x+ | 500px → 3000px+ | Not recommended for most tools | Poor — heavy hallucination, diminishing returns |
Always begin with 2x and evaluate. If more resolution is needed, try 3x, then 4x. Going straight to 4x or higher wastes processing time and often produces worse results than a conservative approach with post-processing.
Content-Specific Upscaling
Different image types need different AI models. Using the wrong model produces unnatural artifacts.
Photos (General)
Use general-purpose photo models for landscapes, architecture, products, and everyday photography. These models balance detail reconstruction with natural appearance. Real-ESRGAN's general model handles most photos well.
Anime & Illustrations
Cartoon and illustration content needs specialized models trained on line art and flat colors. General photo models blur line edges and over-smooth flat areas. waifu2x and Real-ESRGAN's anime model preserve sharp lines.
Text & Screenshots
Text-heavy images (screenshots, documents, code) need models that preserve sharp edges and character clarity. Upscale at 2x maximum for text — higher scales often merge letterforms and reduce readability.
Portraits & Faces
Face-specific models like GFPGAN focus on reconstructing facial features. They excel at eyes, skin texture, and hair detail. Use face restoration as a separate step after general upscaling for best results.
Old & Damaged Photos
Vintage photos need models that handle noise, scratches, and fading. Clean artifacts first, then upscale with a general photo model. Colorize after upscaling for the sharpest results.
Medical & Scientific
For accuracy-critical imaging, avoid generative AI upscalers entirely. Use traditional interpolation or non-generative super-resolution methods that do not invent detail. Always verify against known measurements.
Upscaler Models Explained
The major AI upscaling models, their strengths, and when to use each one.
| Model | Type | Best For | Key Strength |
|---|---|---|---|
| Real-ESRGAN | Open-source, GAN-based | Photos, general use | Excellent detail reconstruction, multiple models, runs locally |
| waifu2x | Open-source, CNN-based | Anime, illustrations | Preserves flat colors and sharp line edges |
| SwinIR | Open-source, Transformer | Denoising + upscaling | State-of-the-art denoising combined with upscaling |
| GFPGAN | Open-source, face-focused | Face restoration | Reconstructs facial features with high fidelity |
| Topaz Gigapixel | Commercial | Professional print | Most models, best face handling, fastest processing |
| Magnific | Commercial, cloud | Creative upscaling | Highest quality at extreme scales, artistic enhancement |
Hardware & Performance
Processing time depends on GPU, image size, and scale factor. Here is what to expect.
| Hardware | Time per Image (2x) | Time per Image (4x) | Batch Capability |
|---|---|---|---|
| Browser (WebGL) | 2–8 seconds | 5–20 seconds | One at a time |
| GPU (NVIDIA GTX 1060+) | 1–3 seconds | 3–8 seconds | Unlimited queue |
| GPU (RTX 3060+) | 0.5–2 seconds | 2–5 seconds | Unlimited queue |
| CPU only | 15–60 seconds | 30 seconds – 5 minutes | Sequential processing |
Large images (4000px+) at 4x may exceed GPU VRAM. Process in batches of 5–10 images, or downscale to 2000px before upscaling. Browser-based tools manage memory automatically but are slower.
Upscale for E-Commerce
Marketplace requirements, supplier image rescue, and compliance workflows.
E-commerce platforms enforce minimum image dimensions for zoom and display quality. If your product photos are smaller than required, AI upscaling can bring them to compliance without reshooting.
| Platform | Minimum Size | Recommended | Notes |
|---|---|---|---|
| Amazon | 1000 × 1000px | 2000 × 2000px | Required for zoom feature. Square format. |
| Shopify | 2048 × 2048px | 2048 × 2048px | Generates thumbnails automatically from large source. |
| Etsy | 2000 × 2000px | 2700 × 2025px | 4:3 or square preferred. High-res for search ranking. |
| eBay | 1600 × 1600px | 2000 × 2000px | Supports zoom at 1600px+. |
| WooCommerce | No minimum | 1200 × 1200px | Consistent sizing across catalog looks professional. |
Check current dimensions
Right-click the product image, select Properties or Inspect. Note width and height in pixels. If below the platform minimum, upscaling is needed.
Clean artifacts first
Supplier images often have JPEG compression artifacts. Run a light denoise (20–30%) to clean blockiness before upscaling. This prevents artifact amplification.
Upscale to meet requirements
Calculate the minimum scale factor needed. A 800px image needs 2.5x to reach 2000px — round up to 3x for safety, then crop to exact dimensions.
Verify detail at 100% zoom
Check product labels, texture details, and edges. Zoom to 100% and inspect — blurry or plastic-looking areas mean the source was too low quality for the scale factor chosen.
Old Photo Restoration + Upscaling
The correct workflow for scanning, restoring, and upscaling vintage photographs.
Old photos require a specific sequence: scan → clean → upscale → colorize. Doing steps out of order produces inferior results. Here is why each step matters.
Scan at 600 DPI or higher
High-resolution scanning captures every detail the physical photo contains. A 4×6 inch photo at 600 DPI produces a 2400×3600 pixel image — more than enough for AI to work with. Never scan at 72 or 300 DPI for archival work.
Remove dust and scratches
Use inpainting tools to remove dust, scratches, and torn areas. Clean the image before upscaling — upscaling amplifies defects along with detail. AI inpainting tools can fill in missing areas plausibly.
Upscale with a photo model
Use Real-ESRGAN or Topaz with a general photo model. The AI will reconstruct worn texture, smooth faded gradients, and sharpen soft edges. Use 2x–4x depending on your target output size.
Colorize after upscaling
Colorization works best on clean, high-resolution input. Upscale first so the colorization model has more detail to work with. Verify colors against any known references (clothing, signs, landmarks).
Batch Upscaling
Processing multiple images efficiently with consistent settings.
Batch upscaling is essential for large photo libraries, product catalogs, or archival projects. The key is consistent settings — every image processed with the same model and scale factor for uniform results.
CLI Tools
Real-ESRGAN CLI: Process entire folders with one command. python inference_realesrgan.py -i input/ -o output/ -n realesrgan-x4plus. Supports all models and custom parameters.
GUI Batch Tools
chaiNNer: Node-based GUI that chains upscale, denoise, and export steps. Upscayl: Simple interface with batch mode. Both support drag-and-drop of entire folders.
Memory Management
Process images in groups of 5–10 if VRAM is limited. Monitor GPU usage with Task Manager or nvidia-smi. Reduce batch size if processing crashes or slows significantly.
Quality Assessment
How to evaluate upscaler output and identify common problems before delivery.
Inspect at 100% zoom
Artifacts are invisible at thumbnail size. Zoom to 100% and check faces, text, edges, and flat color areas. This is where over-smoothing, halos, and hallucination become visible.
Check for plastic skin
Face photos should retain skin texture — pores, fine lines, and natural variation. If skin looks waxy or porcelain, reduce face enhancement strength or switch to a fidelity mode.
Look for edge halos
Bright or dark halos around object edges indicate over-sharpening. This is common at 4x and above. Reduce post-processing sharpening or use a lower scale factor.
Verify text readability
Text in images should be sharper after upscaling, not blurrier. If text becomes unreadable, the model may be the wrong type (photo model on text content) or the scale factor is too high.
Common Mistakes
Avoid these pitfalls to get the best results from AI upscaling.
1. Upscaling compressed JPEGs
JPEG compression artifacts (blockiness, mosquito noise) get amplified at higher resolutions. Always denoise or de-block before upscaling. Better yet, use lossless or high-quality source files.
2. Going straight to 4x or higher
Start at 2x and evaluate. Higher scales produce diminishing returns and more artifacts. It is often better to upscale 2x twice (with a clean intermediate) than to go 4x in one pass.
3. Using the wrong model
Photo models on anime blur line art. Anime models on photos produce unnatural textures. Text models on faces miss skin detail. Match the model to the content type.
4. Expecting miracles from bad source
A heavily blurred, tiny, or severely compressed image cannot be made perfect. AI reconstructs plausible detail, not guaranteed accuracy. Set realistic expectations based on source quality.
5. Double upscaling
Upscaling an already-upscaled image amplifies artifacts from the first pass. Always upscale from the original source. If you need 4x, do 4x in one pass, not 2x then 2x.
6. Forgetting to check at 100%
Output looks great at thumbnail size but reveals problems at full resolution. Always inspect at 100% zoom before delivering to clients or uploading to platforms. I once pushed a 640px supplier photo to 4x for a listing — zoomed out it looked sharp, at 100% the fabric weave was pure invention.
7. Skipping post-processing
Raw upscaler output often benefits from light sharpening (10–20%) and contrast adjustment. The upscale is the foundation — finish with minor edits for the best result.
Tools Comparison
Free tab, free desktop app, $99 pro suite — which upscaler earns its place for a one-off photo versus daily work.
| Tool | Type | Price | Best For | Privacy |
|---|---|---|---|---|
| AFFLIGO Image Upscaler | Browser | Free | Quick one-off upscaling, no install | 100% client-side — nothing leaves your device |
| Real-ESRGAN | Desktop / CLI | Free, open-source | Batch processing, advanced users | 100% local — runs on your computer |
| Upscayl | Desktop GUI | Free, open-source | User-friendly GUI for Real-ESRGAN | 100% local |
| chaiNNer | Desktop GUI | Free, open-source | Node-based processing chains | 100% local |
| Topaz Gigapixel AI | Desktop | $99 one-time | Professional print work | Local processing |
| Magnific | Cloud | $39–299/mo | Creative upscaling, extreme scales | Cloud — images uploaded |
Step-by-Step Workflow
Pick the model, set 2x, drag the compare handle, download — the loop that turns a soft photo shoppable.
Start with the best source available
Use the highest-resolution original you have. If the source is noisy or has JPEG artifacts, clean it first with a denoise tool. Never upscale a compressed copy — always find the original.

Choose the right scale factor
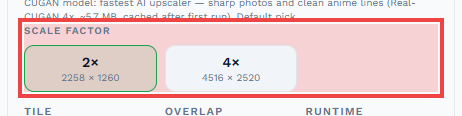
2x for web and social media. 4x for print at 300 DPI. Start conservative and increase only if the result needs more resolution. Remember: you can always downscale the output, but you cannot undo over-processing.
Choose the AI model
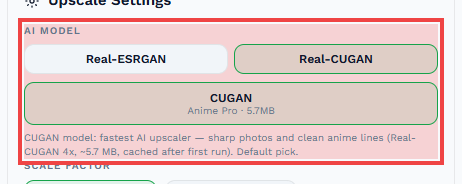
CUGAN Anime Pro is the default — the fastest pick for most images. Open the Real-ESRGAN tab for photo-optimized models like FastGeneral (4.9 MB). Bigger HD models add detail but take longer. Models download once and are cached for later. Accepts JPG, PNG, WebP only — convert HEIC to JPG first.
Run the upscale and download
Click Upscale and track live progress in the popup (percent + elapsed time). Larger images and 4x take longer — keep the page open until it finishes. When done, the button becomes Download. Drag the before/after slider to compare first, then save the result.

Verify at 100% zoom
Inspect faces, text, edges, and gradients at full resolution. Check for plastic skin, edge halos, and hallucinated details. If anything looks wrong, try a different model or lower scale factor.
Frequently Asked Questions
Key Takeaways
- Start with the best source. Upscaling cannot create detail that was never captured. Always find the original before processing.
- 2× for web, 3× for small prints, 4× for print at 300 DPI. Beyond 4×, algorithms hallucinate more than they reconstruct.
- Match the model to the content. Photo models on anime blur lines. Anime models on photos look unnatural.
- Clean before upscale. JPEG artifacts, noise, and scratches get amplified at higher resolutions.
- Always check at 100% zoom. Problems hide at thumbnail size. Inspect faces, text, and edges at full resolution.
- AI generates plausible detail, not guaranteed truth. For accuracy-critical work, use non-generative methods.
I upscaled a 640px image at 2x and 4x: 2x looked clean on a phone screen, 4x showed softness on close inspection — expected from canvas interpolation rather than ML super-resolution. The model-picker options changed processing time but not output size.
Sources: MDN ImageData and imageSmoothing docs, canvas scaling behavior checked Aug 2026.

Karan Kumar


